Our Process
Below are some photos and explanations of our process.
It’s quick, clean, and affordable—no need to empty your bathroom!
Note: The foam used is not spray foam. It’s industrial-grade, two-part high-density foam designed to support weight.
Mobile viewers: Tap each photo to view full size.

After cleaning the tub with a strong cleaner, we prep the area. For cast iron tubs, the area must be covered in plastic.

Fiberglass, cast iron, and cultured marble tub cutting tools will all be hooked to a vacuum to collect dust during cutting.

After the cut is finished, the cut piece and any dust-covered plastic are removed. The area is then vacuumed.

This is a steel tub. Steel tubs flex slightly when standing in them, so we support the tub floor using two-part foam.
Some fiberglass tubs have wood sections for structure. We fill any voids and build up hollow areas as needed.

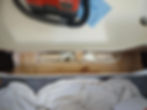
This tub has solid factory support. After placing wood beneath the area, we inject foam through the holes to fill the void.

In areas we can’t see, we use a mirror to verify that the wood and foam have made contact and the area is properly supported.

After templating the tub profiles, they are transferred to the kit and carefully cut and trimmed to ensure a good fit.

On fiberglass, acrylic, and steel tubs, a gusset must be made and installed to stiffen the sidewall and prevent flexing.

A support structure is fit to make contact with the bottom of the kit, providing support so the final step can safely bear weight.

A waterproof membrane is installed in the cutout as a safeguard, but only for the Convertible model due to its full bath option.

The kit is now adhered and sealed in place. Installation is complete, and it can be used after a 48-hour cure time.